Actions
Actions correspond to all controls related to each video event under the actions column. The Actions section can be accessed by clicking inside the row for the video of interest. The Actions buttons are displayed below the row of the selected video. The Stream Type, Vehicle Group, Download State, and the assigned driver is displayed on the page.

Actions Buttons Displayed
Click the row again to conceal the Actions buttons.
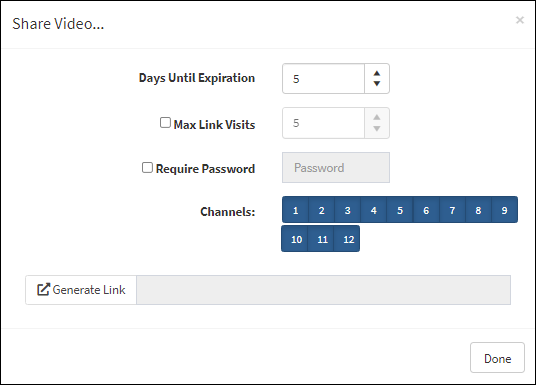
1.Click the Share ![]() Action button to open the Share Video...Dialog box.
Action button to open the Share Video...Dialog box.
2.Set the Days Until Expiration using the arrow keys to increase or decrease the number of days.
3.Click the Max Link Visits check box and use the arrow keys to increase or decrease the number of maximum link visits.
4.If a password is required, click the Require Password check box and enter the password.
5.The active channels are displayed next to the Channels field. Select the channels to include in the shared video by clicking on the channel buttons.
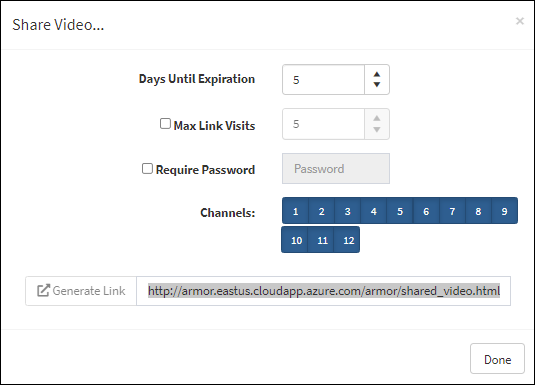
6.Click Generate Link to create the URL for the video link. The URL is stored in Shared Video Links.
7.Click Done.

Share Video Dialog Box

Generating Video Link
![]() Lock – Lock and protect the file from being deleted or unlock and allow the system to delete the file automatically when appropriate. Any sensitive data should be locked. When a file is protected with the lock button enabled,
Lock – Lock and protect the file from being deleted or unlock and allow the system to delete the file automatically when appropriate. Any sensitive data should be locked. When a file is protected with the lock button enabled, ![]() the delete icon will be removed from the Actions area for that video file.
the delete icon will be removed from the Actions area for that video file.
![]() Add Labels – Click to open a dialog box to allow the user to add or delete labels within the video details window.
Add Labels – Click to open a dialog box to allow the user to add or delete labels within the video details window.

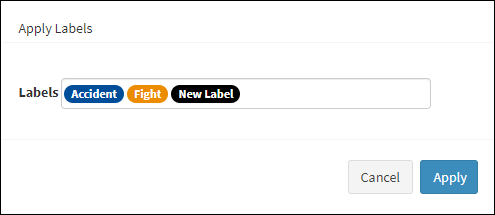
Apply Labels Dialog Box
Click in the Labels box to open a drop-down displaying the available labels. Click on a label to add to the Labels box. Click the label again to remove the label.
Click Apply to save the changes. Click Cancel to stop the changes.
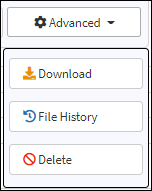
![]() Advanced – Click this button to open a drop-down menu with the following functions.
Advanced – Click this button to open a drop-down menu with the following functions.

Advanced Drop-Down
![]() Download – Download the event in its native format to the local computer for use with other REI software. When playing video in AutoPilot, click the Download Video Action button to download HD5/HD6 video in the Video Management System (VMS).
Download – Download the event in its native format to the local computer for use with other REI software. When playing video in AutoPilot, click the Download Video Action button to download HD5/HD6 video in the Video Management System (VMS).
1.Click the download icon.
2.Select from the download options that are presented.
When the video is downloading, hover over the downloading icon ![]() to display the percentage of the video that has been downloaded. When the video is being prepared to be downloaded, the
to display the percentage of the video that has been downloaded. When the video is being prepared to be downloaded, the ![]() icon is displayed without the blue ring.
icon is displayed without the blue ring.
If the video status is In Queue, the ![]() icon is displayed in place of the downloading icon. When the video is converting, the
icon is displayed in place of the downloading icon. When the video is converting, the ![]() icon is displayed in place of the downloading icon.
icon is displayed in place of the downloading icon.
![]() File History – Click the File History button to open a video details report that can be exported to either PDF or Excel. Click the icon again to close the report. Events which are recorded in the history report are:
File History – Click the File History button to open a video details report that can be exported to either PDF or Excel. Click the icon again to close the report. Events which are recorded in the history report are:
•File ID (File Id: 50214 for example)
•Time of the downloading of the file
•Description of the download status

File History Report
![]() Delete – Any requested or downloaded event that is not locked can be deleted by clicking this button. This will permanently remove all related data from the server.
Delete – Any requested or downloaded event that is not locked can be deleted by clicking this button. This will permanently remove all related data from the server.
1.Click the delete icon.
2.In the confirmation dialog box, click Delete to confirm deletion or Cancel to exit the dialog box without deleting.
