J1939 Configurations
The J1939 Configurations follow the J1939 industry protocol used to monitor vehicle communication and diagnostic information.
Note: Must have HD5, J1939 cable attached to the vehicle.
From the Vehicle Groups window, click Manage J1939...
![]()
...to open the following screen used to create, edit, or remove a J1939 Configuration.

J1939 Configurations Window
The screen consists of the following fields:
Description – Where the J1939 Configurations are identified and listed.
Actions – Where the user can either edit or delete a J1939 Configuration by clicking on the Edit or Delete icons.
![]() Edit – Click to open an Edit Configuration window for a specific J1939 Configuration. The user can select and edit Descriptor values from a drop-down list for a specific J1939 Configuration description.
Edit – Click to open an Edit Configuration window for a specific J1939 Configuration. The user can select and edit Descriptor values from a drop-down list for a specific J1939 Configuration description.
![]() Delete – Click to clear the selected J1939 Configuration from the list. A confirmation message will appear asking to confirm the deletion. Click Yes to continue. Click No to cancel.
Delete – Click to clear the selected J1939 Configuration from the list. A confirmation message will appear asking to confirm the deletion. Click Yes to continue. Click No to cancel.

Setting Deletion Confirmation
Add J1939 Configuration
Click +Add J1939 Configuration to open the Add Configuration window. Enter the name of the new configuration in the Description box.

Add J1939 Configuration
The screen consists of the following fields:
Descriptor – The category assigned for the Index on the list (i.e. Odometer).
Edit – Click to open the Edit Descriptor.
Click the Done ![]() button to return to the initial J1939 Configuration window.
button to return to the initial J1939 Configuration window.
Note: From either the Edit Configuration window or the Add Configuration window, click the Edit icon![]() to open the Edit Descriptor window where an individual Descriptor setting can be configured. If editing from Add Configuration, a Descriptor must be selected before the Edit Descriptor function becomes active.
to open the Edit Descriptor window where an individual Descriptor setting can be configured. If editing from Add Configuration, a Descriptor must be selected before the Edit Descriptor function becomes active.
Edit Descriptor
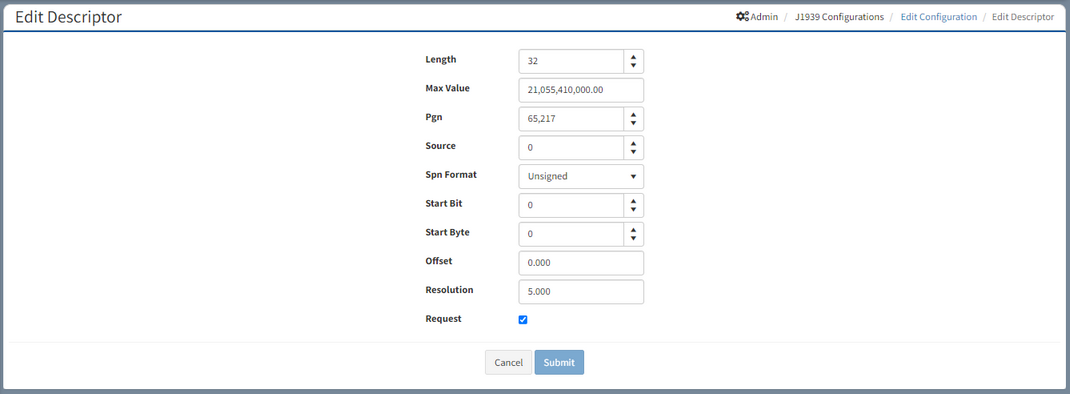
From the Edit Descriptor window the user is able to set the values of the Descriptor field. If the Request check box is selected the DVR requests the data. If the box remains in the default setting of unchecked, the DVR only listens for broadcast data.

Edit J1939 Descriptor Window
Click Submit to apply configuration settings. Click Cancel to clear settings and end Descriptor configuration.
Edit Configuration
From the Edit Configuration window the settings for each Descriptor category can be selected and edited.

Edit Configuration Window
Click the Edit button![]() next to each descriptor to open the configuration window for each descriptor in the same method as the other J1939 descriptors.
next to each descriptor to open the configuration window for each descriptor in the same method as the other J1939 descriptors.
Add Exception
Add an Exception when there is a need to ignore unique and non-essential SPN/SOURCE/FMI codes from a vehicle. The numbers in the SPN/FMI/SOURCE columns denote J1939-defined values to show what J1939 input to ignore. For example, a SPN (Suspect Parameter Number) of 110 is fault code for a Caterpillar-specific J1939 Descriptor value (Engine Coolant Temperature).
SPN: Suspect Parameter Number that identifies the parameter sending the fault code error message. A SPN code is identified by some vehicle manufacturers as a Parameter Identifier (PID).
FMI: Failure Mode Identifier that is used to identify the type of fault detected. A fault or trouble code will be accompanied with a corresponding FMI value.
SOURCE: Source Address identifying the Electronic Control Unit that is sending the Diagnostic Trouble Code.

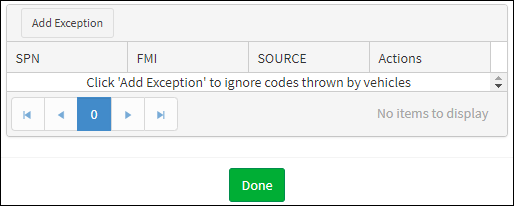
Add Exception Dialog Box
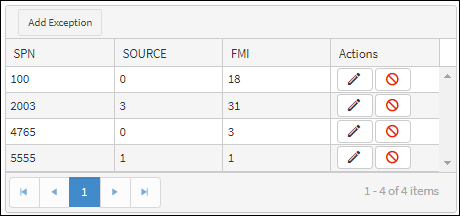
From the Edit Configuration view, click Add Exception to add a row to the Exception Dialog Box. Click Add Exception again to add more rows. The selections are saved automatically. Click Done after completing the entries.

Use Actions Column to Add and Delete

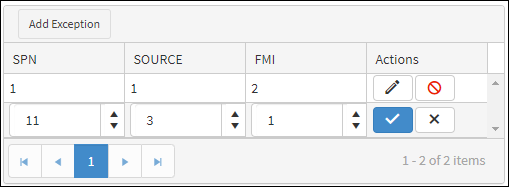
Entering SPN/SOURCE/FMI Codes
From the Actions column click ![]() to enable the user to increase/decrease the number that identifies the user defined J1939 exception to be ignored. Click
to enable the user to increase/decrease the number that identifies the user defined J1939 exception to be ignored. Click ![]() to cancel. Click
to cancel. Click ![]() to delete the exception. Click
to delete the exception. Click![]() to cancel the deletion. A confirmation message prompts the user to continue.
to cancel the deletion. A confirmation message prompts the user to continue.

Delete Exception Confirmation
Click Yes to continue. Click No to cancel the deletion.
