Students
From the Students window, the first and last name, Student identification, Email address, phone number, and parents associated with the student can be reviewed. New students are entered into the Student Tracking system.
Student entries can be edited and deleted in the Actions column.
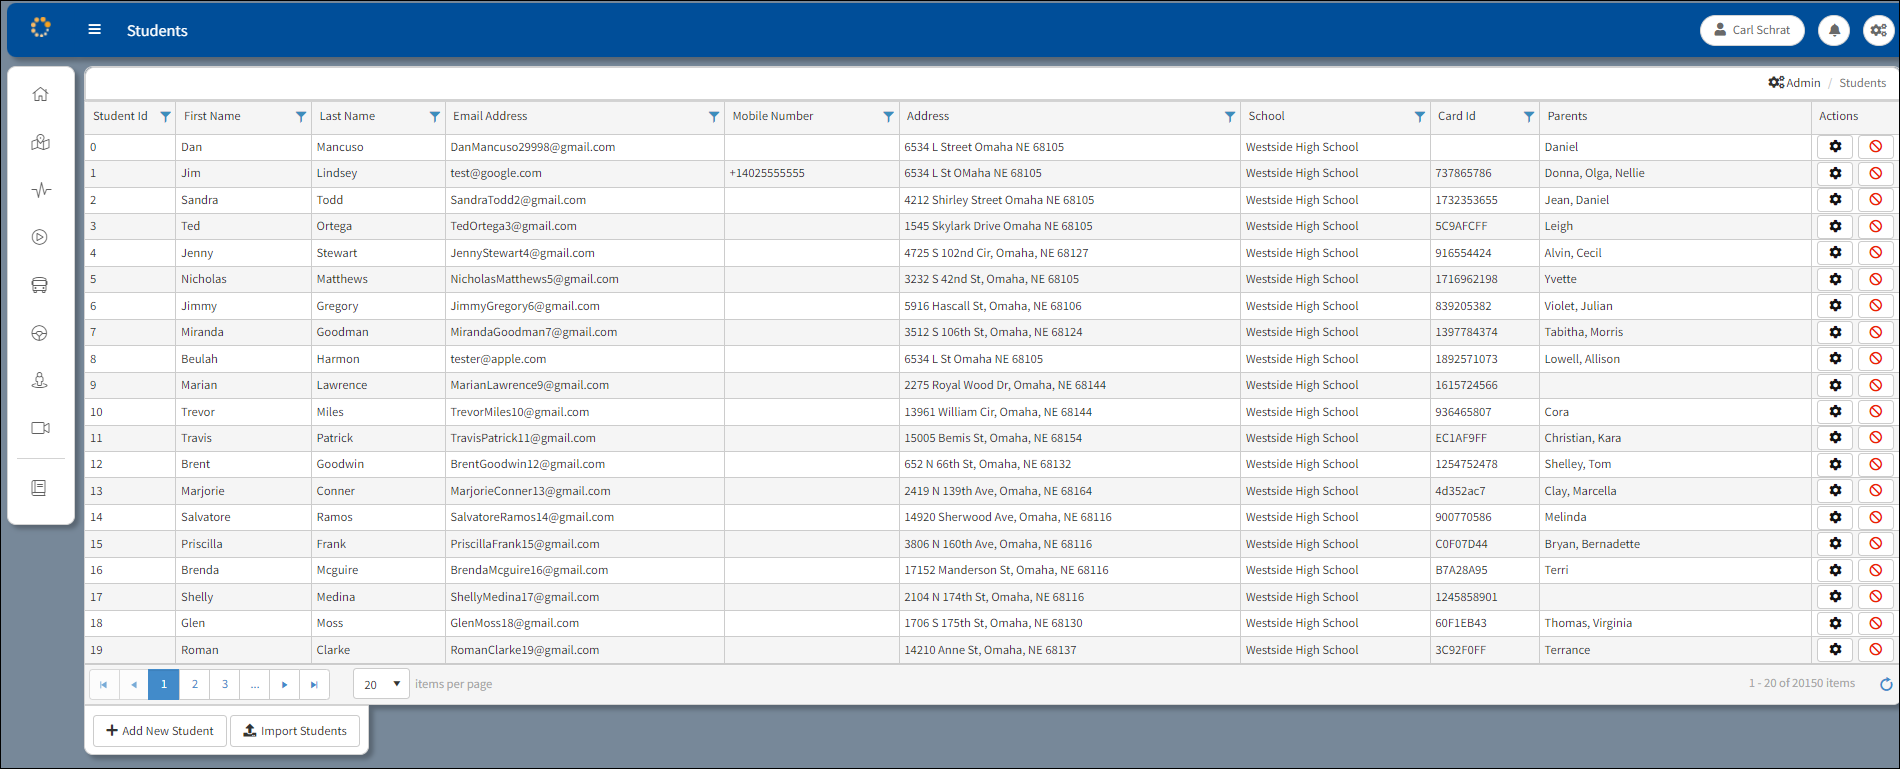
Students Initial Window
Student Id: Student's identification number.
First Name and Last Name: First name and last name of the student.
Email Address and Mobile Number: Email address and Mobile phone number contact for student.
Address: The address of the student.
Note: A phone number or an Email address is required to set up a mobile app.
Card Id: Student's identification card number. This number is needed to enable the system to recognize the student entering/exiting the bus.
Parents: Name(s) of the student's parents.
Actions: Column where the Editing and Delete functions are initiated.
Editing/Adding a Student
Note: A Student Id can be edited only while adding the student to the Student Tracking system. Once the Student Id has been entered into the system it cannot be edited.
To perform a simple update for a single student, or to add a student, go in ARMOR/Administrator and click a 'Students' option which is available if the customer is licensed for Student Tracking.
This enables the user to edit the students individually as follows:
•Edit an existing Student - First Name, Last Name, Email Address, Mobile Phone Number, or Address.
•Add a new Student.
•Select a School
•Delete an existing Student.
To edit a student entry, click the Edit button ![]() to open the Edit Student Dialog box. In the dialog box, the Student information can be changed and the Parent listing can be selected
to open the Edit Student Dialog box. In the dialog box, the Student information can be changed and the Parent listing can be selected ![]() or removed
or removed ![]() .
.
To add a new student, click the Add New Student button at the bottom of the Initial Students window to open the Add New Student Dialog box. Enter the Student information in the left column. Parents are selected by clicking on the corresponding ![]() button in the right column and included in the Select records below... box . Entries can be deselected by clicking the
button in the right column and included in the Select records below... box . Entries can be deselected by clicking the ![]() button.
button.
Parent Id, First Name, and Last Name entries can be sorted by clicking in the column and filtered by clicking the ![]() icon. Refer to the Sorting and Filtering section in the Introduction for information about using filters.
icon. Refer to the Sorting and Filtering section in the Introduction for information about using filters.
If the Student Id or Card Id are already used, the GUI warns and forces the user to resolve the issue before continuing.
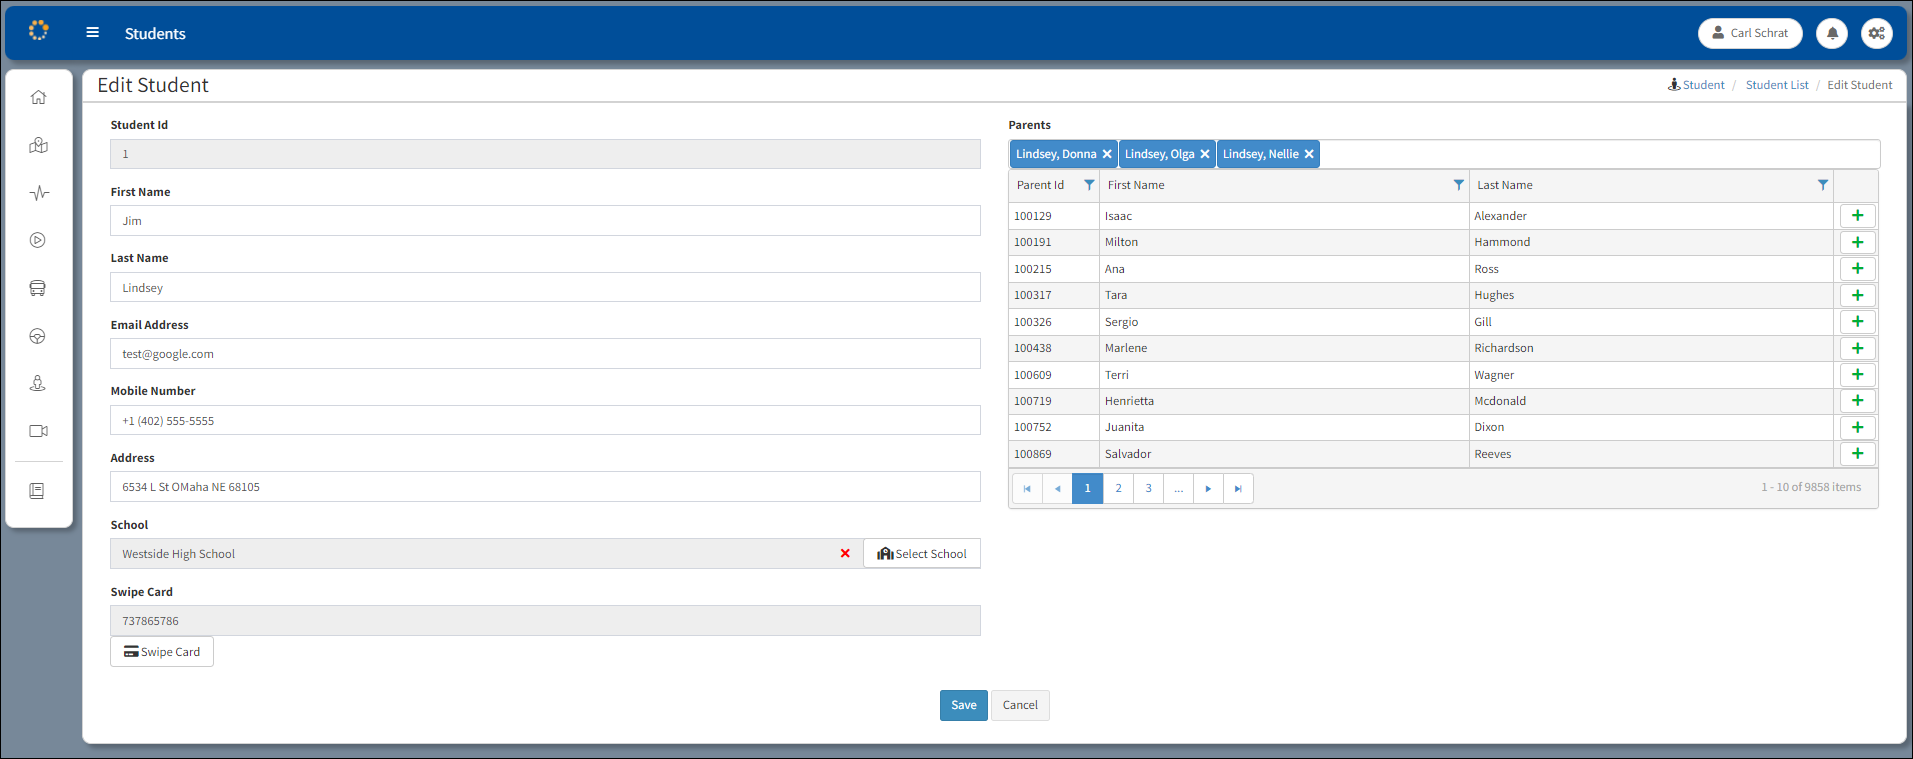
Edit Student Dialog Box
After making the edits, click Save. Click Cancel to stop the editing process and return to the Initial Students window.
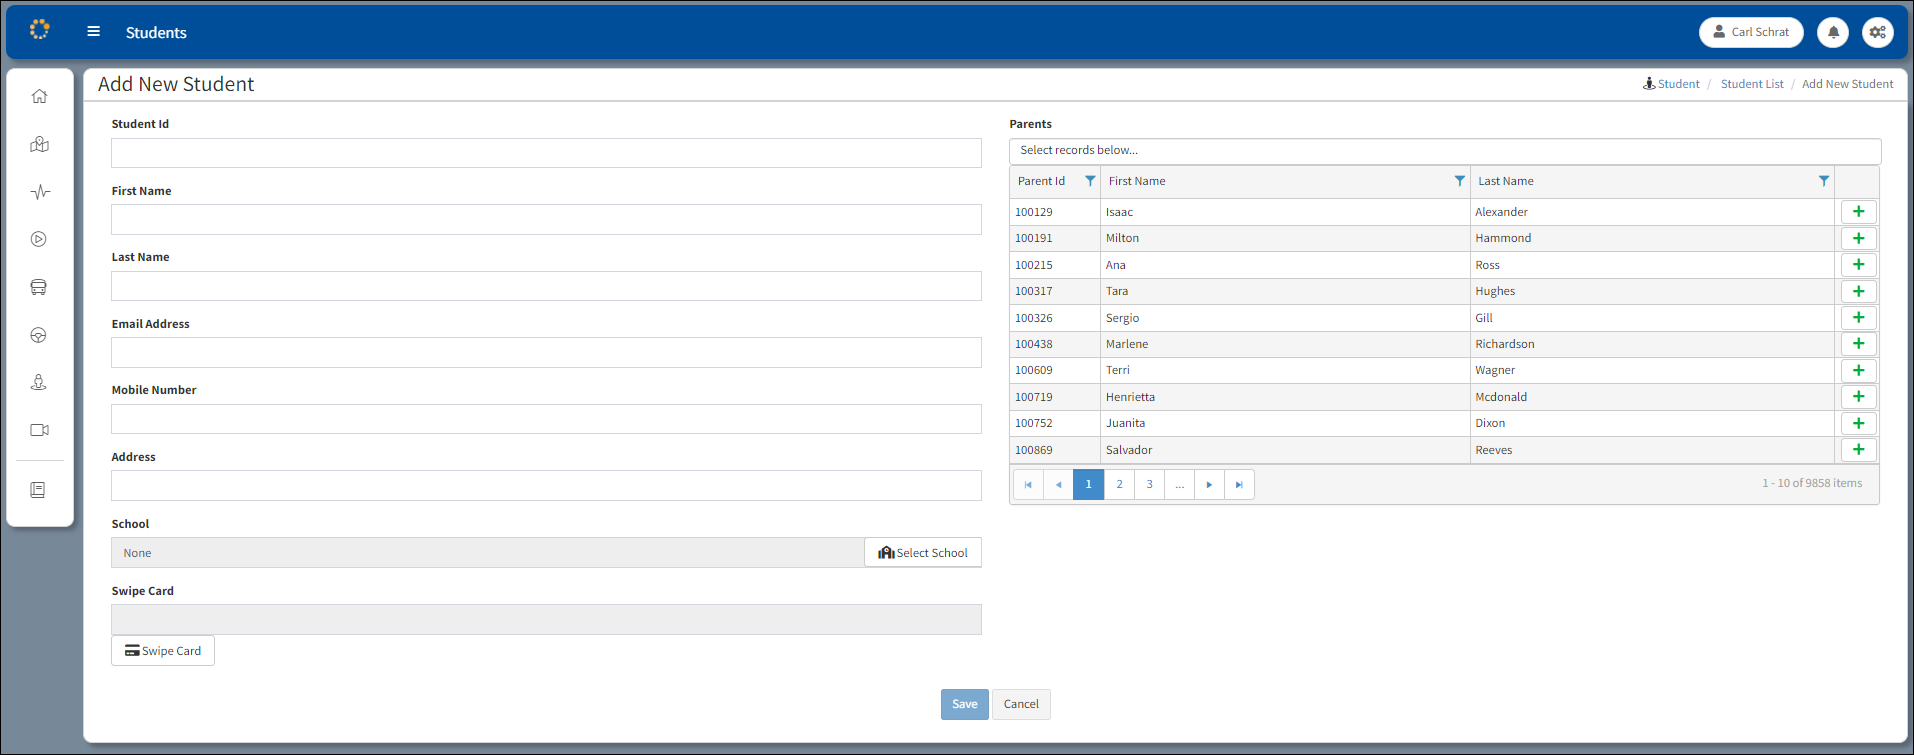
Add New Student Dialog Box
Assign School Stop
To assign a stop to a student, click the Select School button ![]() in the School field to open the Assign School Stop dialog box.
in the School field to open the Assign School Stop dialog box.
From the Assign School Stop dialog box, an existing stop can be selected or a new stop can be created.
Click the Select Existing tab to access the list of available stops. Click on the selected stop and press Select.
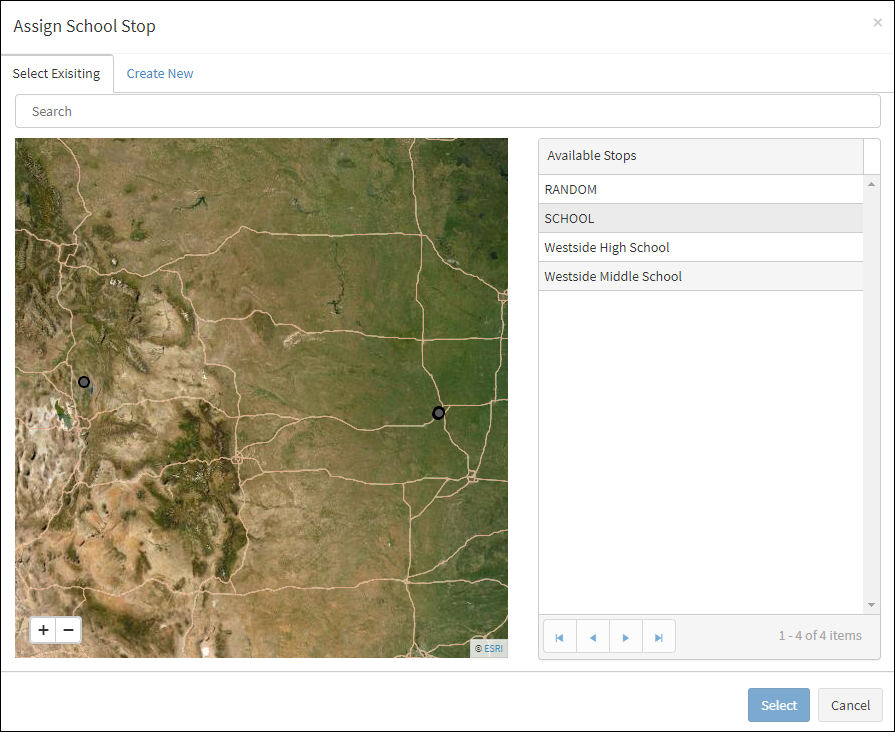
Assign School Stop Dialog Box
Click the Create New tab to initiate the creation of a new stop.
Enter the name of the new Stop in the Stop Name: box (i.e., Bellevue East). Find the location of the Stop by entering the address in the Location: box (i.e., 1401 High School Dr., Bellevue NE, 68005). A green dot displayed on the map ![]() indicates the location of the new stop. Click on the map to move the dot to a different location. Click Submit to add the new stop. Click Cancel to stop the process of adding a new stop.
indicates the location of the new stop. Click on the map to move the dot to a different location. Click Submit to add the new stop. Click Cancel to stop the process of adding a new stop.
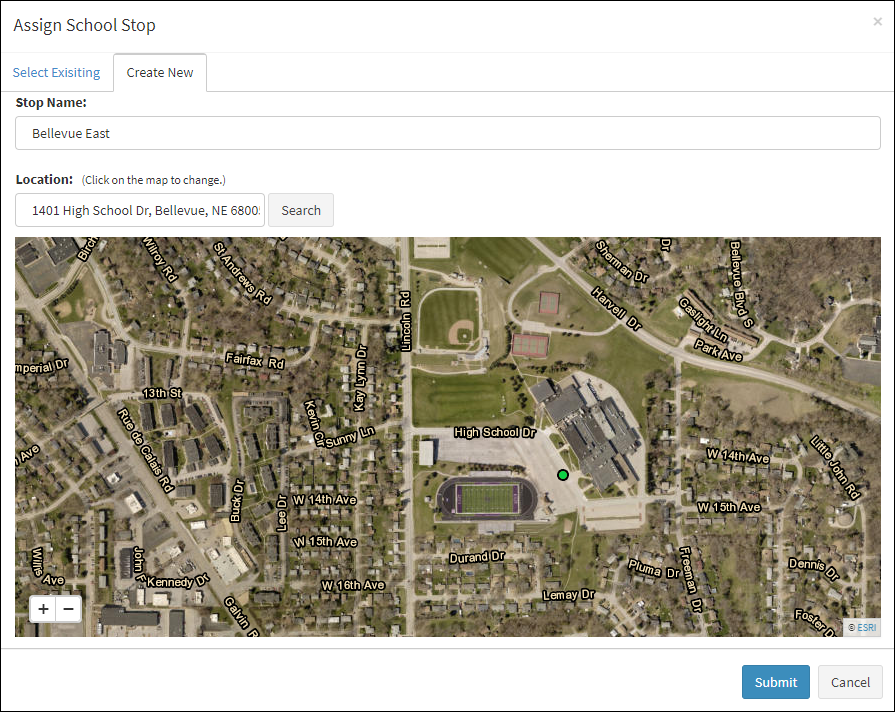
Create New Assigned Stop
The new stop will appear in the School column of the Students window after the stop is created and assigned.
Delete Student
1.Click Delete![]() to the far right of the Students window under the Actions column to remove the student.
to the far right of the Students window under the Actions column to remove the student.
2.A message will appear asking to confirm that the student is selected for deletion.

Delete Student Confirmation Box
3.Click OK to delete it.
Swipe Card
Swipe and Scan Student ID Cards using an applicable card scanning device. Once the card is successfully scanned, click save and the card number is stored in the Student Tracking database.
After adding the new student, click Save. Click Cancel to stop the entry process and return to the Initial Students window.
Import Students
The user will need all student information converted into CSV format prior to using the import functionality. Refer to the information on the Import Students Window sample below for guidance of how to convert files into CSV format.
Click on the Import Students button ![]() on the bottom of the Students window that opens an Import Students window.
on the bottom of the Students window that opens an Import Students window.

Import Students Window
Click on the Choose File button and navigate to the folder where the file to be imported is located.
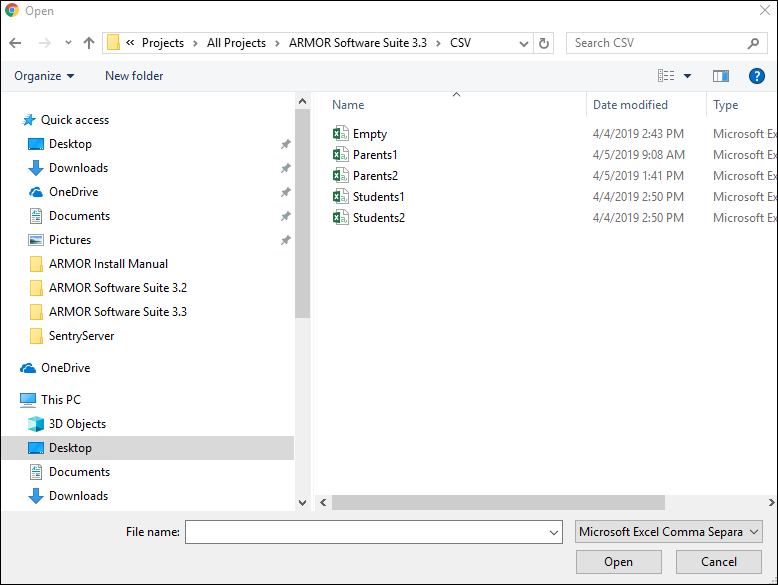
Students CSV Files
Click on the file to upload and its name will appear next to the Choose File button.
![]()
The Upload button will no longer be dormant and can be clicked to upload the file.

Students Record Count displayed with three function options
Hover over the option buttons for a description of the following three functions.
Add new records only: Only records that do not already exist in the database will be imported.
Add and update: New records will be added, and records that already exist in the database will be overwritten with the data in the uploaded file.
Add, update, and delete: Records in the uploaded file will be added and/or updated. All others will be deleted from the database.
Each selection is accompanied with a Summary of changes regarding the records in the file.
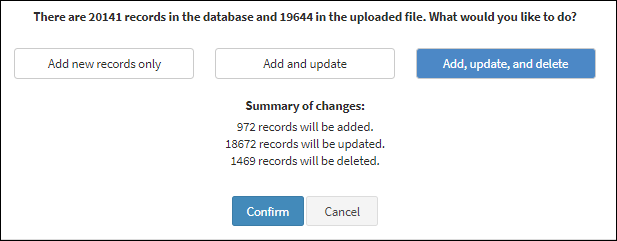
Students Summary of Changes
Click Confirm after making the selection. Click Cancel to terminate the process.
If an invalid email address is found in the CSV file, an error will be reported as follows:

Invalid email Address Warning Message
The line found to contain the error will have to be corrected and the file upload will have to be repeated.
